
Labels are no doubt one of the integral factors in creating the right brand image. With the high importance given to the labels, you must ensure that everything on your product labels is well-crafted and well-designed.
When it comes to the readability of the labels, especially over dark colors, white is the best choice. You might even have it in your logo, so there is no way to exclude white from your printing or go for another color. From the printing perspective, white is not an easy-to-carry color; however, it is not impossible either.
If your labeling requires the use of White color, this article will help you further. So, let’s start our discussion.
What is White Ink Printing?
White Ink Printing technique is not like the ordinary printing of colors. You must take certain actions to show it in your final design.
To display the white Ink on your label, you’ll have to add it as a separate layer underneath the entire design or the specific areas that need to be White.
The use of White in the layer underneath can reduce the transparency of the text or design, and the result is a clear, crisp, readable label. Besides, the white coating also ensures the exact color match of the other shades you have used on your product labels.
How to add white Ink to the product labels?
Before you present your label for printing, it is essential to make changes to fit the white ink printing. You’ll have to add a white background in Adobe Illustrator. Usually, the source file of your product will be in Adobe Illustrator, as it is one of the prominent designing software available.
For people who are unaware of how you can manage it, here’s the process:
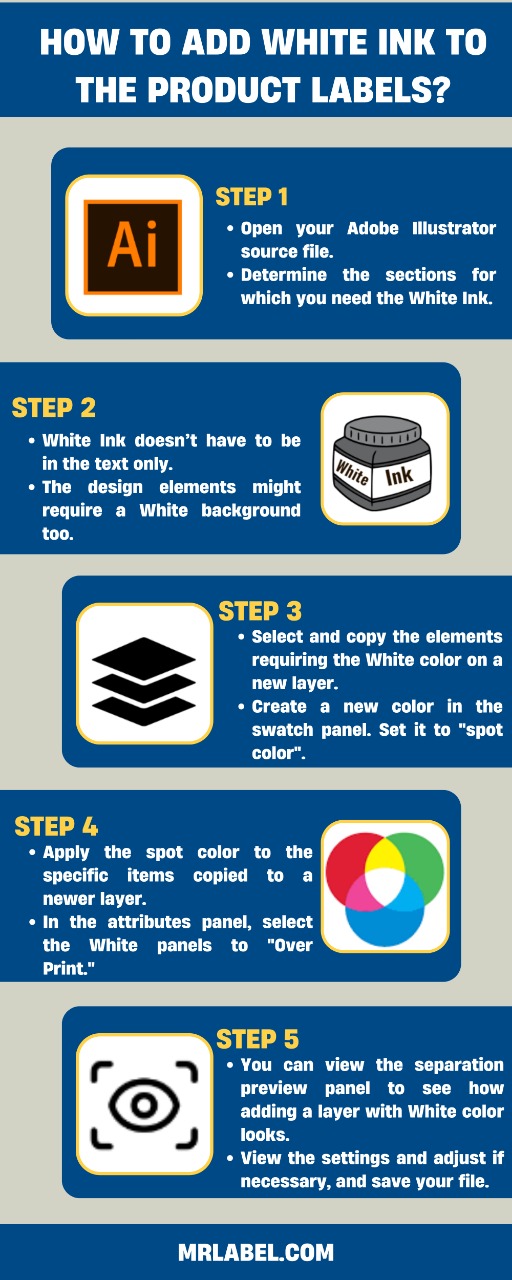
- Open your Adobe Illustrator source file.
- Determine the sections for which you need the White Ink. White Ink doesn’t have to be in the text only. The design elements might require a White background too.
- Select and copy the elements requiring the White color on a new layer.
- Create a new color in the swatch panel. Set it to “spot color”. Apply the spot color to the specific items copied to a newer layer.
- In the attributes panel, select the White panels to “Over Print.”
- The separation preview panel can give you a better idea of how this addition of a layer with White color actually looks. You can view and adjust the setting if necessary.
- Your file is ready.
Can it print on any material?
Printing White Ink on all the label material isn’t usually economical and does not produce the same results. So, you must be particular in choosing the suitable label material to get the best results.
Besides, not all printers can bring in the same results. You’ll have to invest in the specialized CMYK+W Toner-Based Label Printer to get the crisp, vibrant label print.
Without the appropriate and suitable material, you cannot expect the White Label Ink printing in the form you had expected.
Summing up
White Ink Printing can improve the readability and vibrancy of the colors used in the label. However, it needs special settings in the designing software and the right equipment to enjoy the full effect.
At M&R Labels, we can offer you White Ink Printing ensuring the vibrancy in the labels produced for your products. You can contact us today for an obligation-free quote for your custom label designs.

