
One of the most attractive label strategies is the use of stickers. Not just marketing, many people of all ages like stickers and take a closer look at them. Nowadays, you see so many stickers that have become a form of personal expression.
You can use these small items to decorate books, bags, car windows, and even laptops, water bottles, gift packaging, and walls. How would you feel if we told you that you can make stickers with a roll of tape, some images, and a bit of creativity?
We will discuss how you can use some cool designs to create stickers that will be easy, inexpensive, and fun to create. Whether you want to design custom artwork, print images from the internet, or recycle magazine cutouts, the process is simple and satisfying.
Making Stickers With Tape
Before you begin making stickers, here are some reasons why stickers are so popular. Knowing these reasons will help you understand why you should know how to make them.
- Cost-effective: These days, everything is available in the market, but you must keep in mind that every vendor will be making a profit off the product. Buying sticker sheets or professional prints can be cheaper, and you can create something more attractive and cost-effective with them. can add up quickly. Making them with tape requires only basic household supplies.
- Customizable: The best thing about making anything on your own is that you can make it according to your needs and wants. You can turn any image or printed design into a sticker.
- Fun DIY project: Creating stickers by yourself can be an exciting and relaxing activity. Kids, students, or anyone who loves art projects can make stickers.
- Durable: Making stickers with tape is going to make them durable. Tape adds a laminated, waterproof effect, making your stickers more resistant to wear and tear.
Materials You Need
You will enjoy creating stickers with tape because they do not require a long list of materials. Here is a short list of the materials you will need:
- Clear tape: Any clear tape will work for stickers. You can choose the width according to your requirements.
- Paper with images or designs: You can use any print-out, and it will work because the tape will coat the paper. Magazine clippings, printed pictures, doodles, or even handwritten labels are acceptable.
- Scissors, ruler, and other stationery: For cutting out your stickers neatly, you need a good pair of scissors. Apart from these essentials, you will need a bowl of water and a towel or napkin.
Steps To Make Stickers With Tape
1. Choose and Prepare Your Design
You can select any design that you want to turn into a sticker. You can print pictures, create logos, and take out prints to make stickers. Moreover, you can cut designs from publications like newspapers or magazines, or you can create artwork on simple paper to make stickers.
Once you have decided on the design, trim it with scissors. Leaving a little white border around the image makes it look more professional, while cutting right along the edges creates a clean, shape-specific sticker.
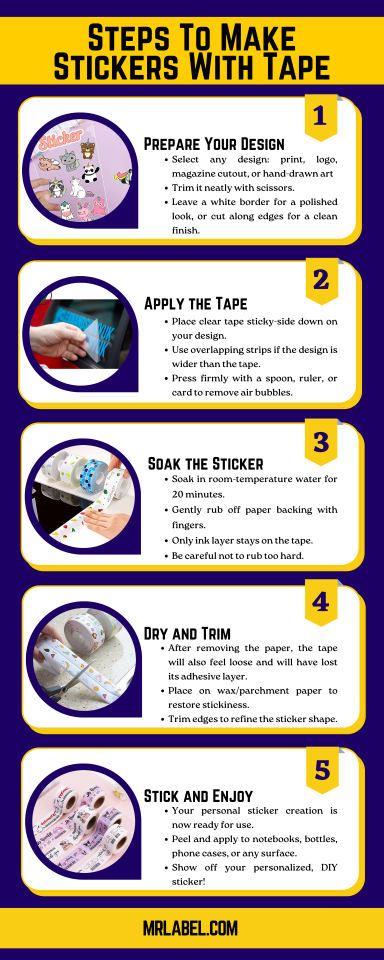
2. Apply the Tape
The next step is to take a strip of clear tape and place it sticky-side down over your design. In case the design is broader than the tape width, you can overlap the design with multiple layers of tape. Press the tape down firmly to ensure it sticks evenly to the paper.
This step is crucial because the tape is what will capture the image. Then use a spoon, ruler, or an old credit card to rub firmly across the tape. This step ensures that you remove any air bubbles or wrinkles. The smoother the tape is pressed, the clearer and sharper your final sticker will be.
3. Soak the Sticker
This part is interesting because you need to soak the sticker in a bowl of room-temperature water.
Leave it in the bowl for twenty minutes so the paper becomes saturated and soft. This process is to loosen the paper fibers so they can be rubbed away, leaving only the ink layer stuck to the tape. After you take the sticker out, pat it to dry and gently rub the back of the paper with your fingers.
The paper fibers will start to peel away, while the ink design stays adhered to the sticky side of the tape. Keep rubbing until most of the paper backing is gone, and only your image is visible through the tape. Be careful not to rub too hard or you may damage the design.
4. Dry and Trim
After removing the paper, the tape will also feel loose and will have lost its adhesive layer. If you want to restore the adhesive, stick the design onto wax paper or parchment paper to store it. Later, when you’re ready to use it, peel it off and press it onto the desired surface. Trim around the sticker with scissors to refine its shape.
5. Stick and Enjoy
Your personal sticker creation is now ready for use. You can place it on a notebook, phone case, water bottle, or anywhere else you want to decorate.
Final Thoughts
All kinds of artwork can be fun, and it can give young people a boost of confidence as well. We have shared how you can turn up your creativity by creating tape stickers by yourself. DIY projects can never be boring, and this one is full of color!
Making stickers with tape is an easy, low-cost craft that requires basic materials such as tape, paper, scissors, and water.
You can transform any design into a durable, personalized sticker. The process is quick enough for kids and beginners, but also versatile enough for crafters who want to explore advanced designs.
